Friday, November 27, 2009

Stability Balls -sizing.

What started as a physical therapy tool and ended up being part of everyone’s workout program, the ball is here to stay. By now I think most of us have seen them and hopefully used this great tool. Surprising some of us haven’t – yes there are a few.

Finding the Size That’s Right For You

This table summarizes the general ball size appropriate for your height and how tall it is (the diameter) when it’s fully inflated.


Please keep in mind that this is only a guideline it really depends on the individual and your leg length. I’m 5’11” and I feel more comfortable with the 55 cm. A better way to get the fit that’s best is that when you are sitting on the ball, your legs should be at a 90-degree angle with your thighs parallel to the floor and your hips at the same height as your knees. However, there are some exercises you may do where a smaller ball might work better; if this applies to you, then you might want to consider having two balls of different size.

For balance, a firmer ball will be more difficult to balance on, so seniors or beginners should consider using a larger, softer ball. And no the ball is not going to explode; it holds me so you’re safe. Actually it supports over 600 pounds.

Typically, the stability balls you will find in most stores are 65 cm; however sometimes you can find a 55 cm ball. If the store nearest you does not have the proper size, try going to a sporting goods store or performbetter.com; they are likely to have a wider variety of sizes.
Most folks assume a SB is only used for core. Yes it’s great for core exercises but don’t limit yourself, its full body. It’s great for most exercises for a change of pace.
If you’re a beginner be careful. Start off with just lying on the ball and getting on and off. Start off with basic crunches and chest presses before you progress to the advanced stuff.


Should you use them? Yes. Sitting or lying on a stability ball helps strengthen your core--no matter which muscle groups you're working.


Crunch

Start by sitting on the exercise ball as if you were sitting on a chair. Slowly lean back and walk your feet forward until the ball is positioned on your lower back region and you are looking toward the ceiling. The top your legs should be parallel to the floor.
Cross your hands on your chest and keep your head in a neutral position looking forward (toward the ceiling). Your chin should not touch your chest at any point

Here are a few great examples for advanced folks:

Pike

Begin in a push-up position with your shins on top of the exercise ball.
Keeping your legs as stiff as possible, use your abs to roll the ball forward, lifting your hips toward the ceiling.
Hold this position for a three count while flexing your abdominal muscles.
Slowly return to the beginning position.
Note: To make easier place the ball closer to your knees.


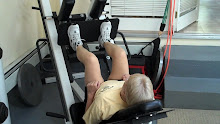
Push Up with Hands on the Floor


Start by positioning yourself in the standard push-up position, with your hands slightly wider than shoulder width. Place your feet on top of your exercise ball.
Slowly lower yourself to the ground until your chest nearly contacts the floor.
Perform a push-up by pressing yourself from the floor back to the position number 1 (the starting position).
Note: If you are a beginner, place the ball under your thighs in step 1. The closer the ball is placed to your feet, the harder it is to complete the exercise.


Back Extension

Begin by kneeling on the floor in front of stability ball and lie face down so that the ball is at your upper abdominal region. Your head should be facing the floor.
Cross your hands over your chest, and raise your torso approximately six inches.
Hold for a count, then slowly and under control, lower your torso to the starting position.
Note: The further the ball is placed toward your hips, the harder the exercise is to perform.
Note: You can add further resistance by holding weights in your arms as you perform this exercise.


Tuesday, November 3, 2009

Tis the season... Flu Season that is!


It's only November but Flu season is already hitting this area hard. For all you Germaphobes out there what's the best defense?

Seriously, let's stay healthy this year.

Which hand sanitizers kill stomach flu viruses?

Answer: Germstar®Noro

Washing your hands with soap and water is the best way to get rid of the gastroenteritis viruses. It does not kill them but it washes them off your hands and down the drain. But when you can’t get to a sink, you need something else. Regular 62% alcohol hand sanitizer gels such as regular Purell® do a great job killing rotavirus but are not that great at killing norovirus1 (they are better than nothing, though).

The company Germstar® has specifically designed a hand sanitizer that kills norovirus! It is called Germstar®Noro.

you can only purchase here:

http://www.germstar.com/us/index.php?pg=sanitizers&sub=2

Annie Pryor has created a great site with Q & A and hard facts:


How long is a person contagious after having the stomach flu?

Answer: A person is still contagious for at least 3 days after symptoms have stopped. A person is contagious starting from the moment they start to feel sick and possibly even a little bit before that. In one study, Noroviruses were detected in the stool individuals 15 hours after they ingested norovirus1. Usually symptoms don't start until 24-48 hours after ingestion. So, if people don't wash their hands well after using the bathroom, they can spread the germs to others before they even know they are going to get sick. People are contagious for at least 3 days after all stomach flu (viral gastroenteritis) symptoms have completely stopped and they feel perfectly fine. That means that even when they feel fine they still have the virus in their stool for at least 3 days. Studies have shown that the viruses are present in the stool for two weeks and sometimes longer so a person can be contagious even longer. If your child suffered from Rotavirus, they are definitely contagious for 2 weeks or more. This is why it is so important to wash your hands well after you go to the bathroom and keep you bathroom clean.


The other nasty virus H1N1:

H1N1 TIPS

Dr. Vinay Goyal is an MBBS, DRM, DNB (Intensist and Thryoid Specialist) who shares the following insights as to how to prevent or mitigate H1N1 and other flus. He states: While you are still healthy and not showing any symptoms of H1N1 infection in order to prevent proliferation, aggravation of symptoms and development of secondary infections some very simple steps, not fully highlighted in most official communications, can be practiced (instead of focusing on how to stock N95 or Tamiflu).1. Frequent hand washing (well highlighted in all official communications).2. “Hands-off-the-face” approach. Resist all temptations to touch any part of the face (other than eating, bathing)3. Gargle twice a day with warm salt water (Listerine is fine if you don’t like salt). H1N1 takes 2-3 days after initial infection in the throat/nasal cavity to proliferate (grow) and show characteristic symptoms. Simple gargling prevents proliferation. Gargling with salt water has the same effect on a healthy individual that Tamiflu has on an infected one. Don’t underestimate the effectiveness of this method.4. Clean your nostrils at least once every day using Q-tips dipped in warm salt water. You can also use a Netti Pot.5. Boost natural immunity with foods loaded with vitamin C.6. Drink many warm liquids including tea, coffee and hot water with lemon. Doing so helps clear viral populations by sweeping them down into the stomach where they are not able to survive.


Stay Healthy!!


Sunday, November 1, 2009

JC Leg Cranks

Great Leg Finisher from JC Santana.

Here’s LeeAnne demonstrating the advanced version (no recovery) workout after working Legs.

2 sets
No rest between exercises

BW Squats 24 reps
Alternate Lunges 12 reps (each leg)
Alternate Split Jump 12 reps (each leg)
Squat Jumps 24 reps

Be careful if you have knee issues. Progressions start with a rest recovery.